Greetings friend. Thank you for being here. Dismiss

  • Skip to primary navigation
  • Skip to main content
  • Skip to primary sidebar

A Designer At Home

Designing Beautiful Spaces. Inspiring Authentic Living. Spreading Good Vibes.

  • About
  • Policies
  • Sponsorship
  • Shop
  • Contact
  • Blog
  • About
  • Policies
  • Sponsorship
  • Shop
  • Contact
  • Blog

Tiled Flip Top Ottomans

August 17, 2015 by CORINNA HENDERSON

thetiledoctorsponsordisclosure
blue grout with natural stone mosaic tiles A DESIGNER AT HOME

Hey Guys!

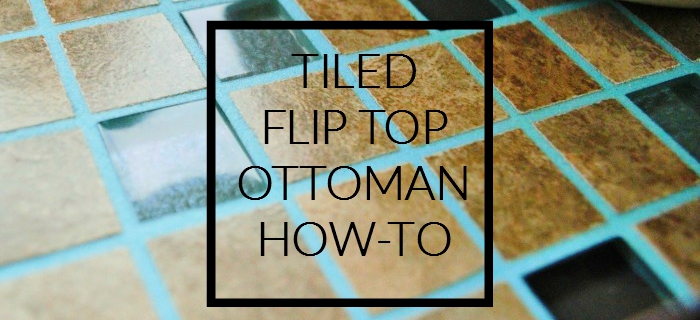
Today it’s going to be a bit of an intermission from what I’ve normally got to share here. I wanted to share with you how I took my Mom’s old flip top ottoman’s and brought them back to life. Flip top ottoman’s are really fabulous and versatile pieces of furniture. But they’re normally not made of quality materials. The “leather” rips and tears easily and the tray’s normally start to warp at the first sign of liquid.

I don’t own any of these flip top ottomans, but my mom does and they’re quite old and a bit damaged. When The Tile Doctor offered to send me some of their fashionable grout- yes, fashionable – it wasn’t my first idea to tile flip top ottomans. But after freaking out a lot over major problems with our DIY bathroom remodel, I thought long and hard about what I could tile that wouldn’t involve tearing up anymore floors in my own home. And that’s when it occurred to me that I owe one to my mom.

tiling a flip top ottoman sounds super easy and makes sense! they see so much water damage


Materials:

  • STAINMASTER® Glamour Grout (1 tub was more than enough for 3 ottoman tray tops for me)
  • Grout Float
  • Mixing Tool and Drill
  • Grout Sponge
  • Flip Top Ottoman
  • Construction Adhesive
  • Tile (I used 4.5 sheets of mosaic tile)

Helpful Pre-Installation Videos:

  • Using STAINMASTER Grout in Your Tile Installation
  • Tile Floor Installation

(I’m sorry but all of my during shot files were warped and unusable!)

I started off by wiping down the ottomans to remove any debris and gunk. Then I painted on a thick layer of construction adhesive. I chose construction adhesive for a lot of reasons. I had a horrible time working with thinset in the past and I don’t think it’s the right application onto a veneered surface. Then there’s the dry time. I didn’t have 24 hours to wait. Right or not, the tiles aren’t budging- but choose the adhesive you’re most comfortable with using with your own research.

Press the tiles into the adhesive and give proper amount of time to dry.

Then mix the grout. There’s no water involved in mixing. There’s a lump of the grout stuff and a pack of an additive. Mix the packet into the grout lump until a peanut butter consistency.

Use a grout float to press and slide the grout between the tiles. 30 minutes later, you’ll need to come back in with a grout sponge and water to wipe the residue off the top.

flip top ottoman tray tiled to protect warping veneer


They’re calling the grout “fashionable,” which I think is especially cute. There are lots of different colors to choose from and additives that give a sparkly appearance. You can check out the colors and different additive options on the STAINMASTER® Glamour Grout Colors page. There’s also a fun video about it on YouTube.


My mom and I really love the effect of the Tuscan-like tile mosaic paired with the aqua colored grout. There really are so many options to using the colored grouts with any kind and color of tile. Check out their fun video about it linked earlier to get inspiration!

blue grout with natural stone mosaic tiles

flip top ottomans are great triple function furniture especially when tiling the trays because they wear better with use

I hope you’ve enjoyed this how-to. Let me know if you have any questions and please be sure to leave a comment and give this post a share before you go. It helps me out a lot :). If you enjoyed this post, maybe you’d enjoy the others, too? Check out the project gallery and archives for more from A Designer At Home. Have a great day!


Filed Under: Blog, DIY Tagged With: blue grout, how to tile furniture, mixing mosaic tile and colored grout, stainmaster, the tile doctor, tiled ottoman, tiled tray, turquoise grout

Future Plans for the Living Room

August 14, 2015 by CORINNA HENDERSON

future plans for the living room on a designer at home

Hey Guys!

I’m sure it’s a feeling you’ve felt before. Perhaps you even feel it all the time. You’ve decorated a space, announced it as done, but know there are a ton more things you want to do with it. Or maybe you don’t ever declare it done because you have all those other things running through your mind. That was me up until recently. Over the course of the past month I’ve taken you through my living room. I’ve shown you the furniture in there, the things I’ve made, and some tips and ideas along the way. But the space has been far from done. And, if I’m going to be completely honest, I’ve already been switching things up. I’m not going to spend eternity talking about and focused on one room though. Especially since we’ve begun a bathroom renovation that I hope to be sharing with you in the Fall.

The next finished space I want to share with you in our main bedroom. There is no master bedroom in the space so it’s the “biggest bedroom,” but before I get there I wanted to talk a little about my future plans for my own living room. I don’t know about you, but I personally feel a bit relieved when I write or type down my ideas. It gets them out of my head and into a place I can reference back to later. This is that space and that’s what I’m doing.

One thing I’ve already done is flip the layout. So if you see picture on Instagram of Facebook and you’re wondering why it looks different than what I’ve “revealed” here, that’s why. But, like I said, let’s not beat a dead horse and just know that the couch and TV has switched spots.

Behind the sofa I really want a console table. I’ve played around with the idea of using a simple system with a plank of wood and shelf brackets. What I really want to do, and what I’m aiming for, is to line that bit of wall with short bookcases so I can style the top, have seasonal decor storage behind the sofa, and have space for more books and toys on the shelves that hang out on either side of the sofa.

Just Imagine: Bohemian Decor

I also really want a tall campaign style lingerie chest/tall dresser. I’m obsessed with storage and ages ago when I saw my idol, Emily Henderson, put one in her living room, I knew I had to do the same.

Emily Henderson's Living Room
Emily Henderson’s Living Room

I’ve probably mentioned it before, but my dream is to take down or open up the wall between the living room and kitchen. My gallery wall would have to go (not nearly as sad about that as that may have come off), but I think a nice island or peninsula here would make a really great family interaction flow.

Southern Living: Designer Amie Corley

Underneath the large wall of windows I have a gold bar cart. I think it looks a little silly in size in this spot and I’d like to pick up something more scale appropriate for the wall. Maybe even adding in more seating with a loveseat or sofa (vintage, of course, and awesome, of course). Or a trunk for more toys?

Sneak Peek: Julia Okun of Rennes on Design*Sponge

I’ve been stuck on the fence over my sofa situation. I LOVE my sofa. Like, a lot. But I also really love the look of a plush sofa covered with drop cloth or loose fabric or a coverlet. I picked up a coverlet a while back for this purpose but I can’t do what I want with my current living room sofa. But I could with the one I’ve banished to the garage (it’s mint in color and absolutely destroyed with stains from the little one, irrelevant if I’m covering it up though). I find both to be comfortable, it’s really just the aesthetic I’m struggling with.

Apartment Therapy: Rohde's "Opportunistic" Design Laboratory
Apartment Therapy: Rohde’s “Opportunistic” Design Laboratory

Do you own a vittsjo shelf? I’m obsessed with their simplicity. I had always planned on putting one in our only bathroom, but it’s a tight squeeze in there already. So I’m thinking of flanking our credenza with two of the skinny units. More space to decorate, more storage, and it fills up blank wall? Where’s my credit card… I think I’d want to give them a finish like the shelves below have.

Irene Neuwirth's home via Mix and Chic blog.
Irene Neuwirth’s home via Mix and Chic blog.

And one final idea for the space: Right now I have the bentwood rocker in the corner of the living room. I never wanted it in the first place but had to buy it for the bentwood foot stool I actually wanted. So I’m going to clean it up and put it on craigslist (email me if you’re interested!). I’ve got a rattan armchair I’m going to pull in that I had banished because I didn’t like it’s cushions until I threw a Mexican blanket over it. Thank God I hoard things I sporadically love and hate, amiright?

So that’s where I’m going to wrap things up with the Living Room. The only other space I’ve decorated is the “main” bedroom, so I’ll start sharing that next! And then we will hopefully be ready to start chatting bathrooms! We’ve already started demo but it’s going very slowly… Have a great day!

Filed Under: Blog, Home Files, Living Room

How I Made It: Gold Arc Lamp

August 12, 2015 by CORINNA HENDERSON

a basic boring lamp made over to fit in with vintage decor

Hey Guys!

One of the hardest pieces for me to decide on in a room is lighting. There aren’t many lighting options out there that I like, and even fewer than what I can afford. Short of living in complete darkness until I could stumble onto the perfect floor lamp for the perfect price to pop up and not sell within minutes on Craigslist, I had to put something in the room.

The style I’m particularly coveting at the moment are arch lamps. They’re not especially hard to come by on a budget. But the lamp shades turned me off on a lot of them. The ones I found through Walmart, Target (though Target & Walmart have gotten in better models than what was available back when I first made over my particular lamp), and IKEA all has fabric shades and it wasn’t the style I wanted. The one I ended up settling on was this one from Amazon.

I wasn’t thinking a whole lot about the brushed nickle finish of the lamp. Once the lamp had lived in my living room for a while, though, I realized the finish wasn’t going to work for my decor. I needed a warm leaning metal, and who doesn’t love gold at the moment? Nobody, that’s who.

So I toyed around with the idea of spray painting it, but I’m a lazy spray painter and didn’t want to live with the paint drips and flaking because I didn’t prep properly and I didn’t want to take the lamp apart either. Then just a few months into this dilemma I came across a View Along The Way’s tutorial for saving a garage sale lamp with rub n buff. I’d never used the product but if it worked for her, I was going to make it work for me.

I was aiming for a finish similar to either this Alto Sconce from Cedar and Moss,

CedarAndMossAltoSconceBrassCL

Or this Modo Table Lamp form Matter Matters.

Modo Table Lamp Matter Matters

I ended up going for the rub n buff method for a lot of reasons- spray paint inherently hates me, things I spray paint normally don’t wear well, and the finish from the View Along The Way inspiration post looked exactly like what I’d hoped for.

Brushed Gold Basic Lamp Makeover

Here’s How I Made It:

Supplies:
  • Rub ‘n Buff
  • Inexpensive Lamp
  • Small Sock

So if you’re familiar with how to use Rub ‘n Buff, you probably won’t need me to go on any more. Just be sure to leave me a nice comment before you leave 😉 If you aren’t familiar with the product, like I wasn’t familiar with the product, then keep on reading for my process.

I actually snatched one of my 3 year old’s sock since I knew it would hug my hand better than a larger sock. That and my husband is tired of me stealing his socks for staining wood, so I figured I’d give his socks a rest this time. I focused the product onto one fingertip and massaged the product onto the surface.

Use a small sock and the tip of a finger to spread the wax out lightly

I found it best to be easy with the amount of pressure otherwise I was simply wiping the product away. Work in thin coats, allowing the wax to harden in between applying more. Again, I found I just wiped the product off the lamp if the layer beneath wasn’t hard yet.

1 coat of grecian gold rub n buff over brushed nickel finish amazon arch lamp

I think getting opacity was the most frustrating part of this process. It’s not difficult, so don’t let me deter you from attempting this. But the tutorials I’d read using this product before gave me the impression that the stuff lied down more opaque than it did. So keep that in mind as you work and apply the product in layers.

The finish is perfect, but the color is way more yellow than the swatch made it look. I wasn’t sure at first if I hated it or loved it, but now that it’s been in my home for a while, I love it.

gold finish DIY arc lamp vintage look retro

The gold suits the space so much better now though, and feels more luxurious than the cheap lamp that it once was. I’m really diggin’ how the gold plays against the white walls and wood tones in this space.

gold arc lamp- enhanced amazon lamp. never would have thought of it!


Filed Under: DIY, Living Room Tagged With: arc lamp diy, arch lamp diy, gold lamp diy, gold light tutorial, how to use rub n buff, new retro looking lamp, rub n buff lamp, rub n buff light, vintage arc lamp diy

Industrial Rustic Boho Shelves

August 10, 2015 by CORINNA HENDERSON


Do-It-Yourself Rustic Boho Shelves tutorial

Hey guys!

My favorite DIY’s always involve wood. I love the look and what it adds to a space. But sometimes wood needs balance and that’s why industrial style is so fantastic. Pairing wood with metal elements is a harmonious blend between cold and warmth. But the typical metal pairings are just a bit too industrial for my taste. So I found these very cool shaped white brackets from IKEA. Their geometric shaped paired with the softer white metal paired with a rustic wood finish really lend themselves well to a boho styled space. But really, they’d look pretty darn great anywhere.

The look I was going for involved having to use the brackets on top of the shelf versus below as traditionally used. These brackets are designed to be used traditionally. We’re going to “hack” them in a sense to work the way we want.

Rustic Boho Shelves Tutorial & IKEA Ekby Lerberg Hack

Here’s How I Made It:

I picked up my lumbar from Home Depot and asked to have my 10 foot piece cut into thirds and they did all the measuring for me and ensured it was even. I brought the wood home, dusted them off and stained them. I used a very light layer of a wood stain in “special walnut.”

stain wood with choice of stain

While those dried, I started marking out where holes for the brackets need to be made on your wall. I like to use painter’s tape for this so that any mistakes won’t be written on my walls. The design of these brackets works by using a smaller headed screw that the larger hole fits over, then sliding the groove of the bracket onto the neck of the screw and then you’d just tighten the screw down. I wasn’t planning on using them this way so I made sure to mark the larger circle of the holes in the bracket that went against the wall.

predrill holes into the wall and place wall anchors in place if the holes dont line up with studs

Highlighting the problem with using the ikea ekby lerberg bracket upside down and how to combat this problem

I predrilled holes into the wall where I marked and put in wall anchors since where I wanted my shelves didn’t line up with studs. I knew I had to predrill the holes because I wouldn’t be able to use the power drill for the final install step.

Then I lined up the brackets onto the lumber and marked where the screws need to be screwed into the wood. These holes will line up with the end of the groove. Unlike the wall, we are using the sliding into place feature with this side. I noticed, on my brackets at least, that there were some imperfections in the holes and grooves, so I numbered the brackets just in case it caused variances in how they fit.

mark holes for ekby lerberg bracket onto wood for shelf

drilling screws into wood of shef bracket

With the holes marked, I went in and drilled the screws partially into the wood, making sure to leave room for the bracket to slid into place.

The only way I could get into the bracket to tighten the screws was with a socket wrench. Because I wasn’t using the bracket as intended, I couldn’t start the wall screws until I had the bracket up against the wall. So hubby and I took turns hand cranking the screws into place.

use a socket wrench to fit into tight space of ekby lerberg bracket

When all of the brackets were secured to the wall, I took a piece of lumbar, lined up the screws with the holes and slid it into place. Either be the person holding the lumber in place or have someone else do it while tightening the screws. This lumber has some weight so be careful.

And then It’s time to have fun with them. I kept them pretty high up off the ground because my 3 year old would love to turn them into a ladder.

DIY rustic industrial boho shelves unsing everybody's favorite bracket supplier- IKEA Ekby Lerberg

Shelves are so practical and a great place for parents to have fun with decor. I’ve collected a lot of old and new items here that make me happy. I played around with the arrangement until my eyes were happy.

DIY rustic industrial boho shelves unsing everybody's favorite bracket supplier- IKEA Ekby Lerberg

decorating with small items looks bigger when places on an object with cubbies on a shelf

Supplies:

Quantities will vary based on the number of shelves and how long your shelves will be.

10x8x2 Piece of lumber
Heavy duty walls screws and anchors (with a head larger than the holes for the brackets)
1.5 inch Wood Screws
Power drill and phillips head and general purpose twist bits
Socket wrench and phillips head bit
IKEA Ekby Lerberg shelf brackets
Optional: Wood Stain and Sealer

bright plant fileld corner of a living room with a bar cart turned plant cart and diy shelves bring in an element of industrial rustic feel

Are you a total IKEA lover? I love how easy it is to mix in IKEA pieces with vintage pieces. I also love how easily they can be hacked into something unique. Have you ever hacked an IKEA piece before? What’s your favorite IKEA hack?

Filed Under: DIY, Living Room Tagged With: bohemian decor, boho decor, diy shelves, floating shelves, industrial shelves, rustic decor, rustic shelves, shelf tutorial, styled shelves

Free Watercolor Printable/Downloadable

August 7, 2015 by CORINNA HENDERSON

gotta save this for later! free watercolor downloadable I can def use this

Hey Guys!

Today I have a really low-key post for you. A while back the little guy and I were painting watercolor and I thought it would be really helpful for those looking for free water color images to use for backgrounds/filling frames/using with Picmonkey/whatever if I created a few pieces and made them available for download. So today I’m sharing those images with you!

The colors are peachy/pink/purple/red. If you’d be interested in different colors, I take requests! Leave them in the comments below, watercolor or otherwise, and keep your eyes peeled for the next free downloadable.

watercolor free downloadables no strings attached

To receive access to the free images, sign up for the A Designer At Home newsletter below. You’ll be subscribed to email notifications that will deliver new blog posts as they’re posted. Which means you’ll also find out when new freebies come out, too. If you’re already signed up for the newsletter, just enter and confirm your information here again (or send me an email at adesignerathome@gmail.com, this just may take a little longer) and you’ll receive access to them, too!

FREE watercolor Download & Printable

Have a wonderful day! I’d love to see what you create with the images, tag me in any social media picture so I can check it out and show it some love!

Filed Under: Freebies Tagged With: free printable, free watercolor, pink watercolor, watercolor, watercolor for overlays, watercolor for picmonkey

How to fit Lots of Storage in a Small Living Room

August 5, 2015 by CORINNA HENDERSON

stylish ideas for maximizing storage in the living room- there's lots of great ideas for those with little kids!

Hey Guys!

I LOVE finding ways of stretching the space in our small home. I’m a borderline hoarder and I have a 3 year old son who loves to shop (yes! really!). So I’ve got to find ways of hiding my growing collection of glass bottles and my son’s growing collection of Matchbox cars. I like to toot my own horn a little bit on this subject because I think I’ve done a pretty darn good job of fitting in lots of storage while still having a cute space to hang out in! Let me share what I’ve done to capitalize on our small space as well as some fabulous ideas from the blogosphere!

Creative ideas for living room storage

First and foremost, I love baskets. I think every self proclaimed decorator loves baskets because they really are an amazing piece to add to a room. Big baskets sit fine on the floor and small ones fit nicely atop shelves and under tables. I use baskets to store train sets, matchbox cars, legos, decorative items not in use at the moment and media “junk.” But you know, anything can go into a basket.

all the favorite toys are hidden in cute baskets

have a seat! the puppy doesn't bite and I promise it's okay to move the pillows!

The second piece that’s a must in a space with good storage is furniture with cabinets/drawers. You’ll see it everywhere right now, people are turning credenzas and dressers into media cabinets. And it’s seriously so smart. Even if you don’t need storage space for traditional media cabinet things, those cabinets and drawers are perfect for hiding away extra candles, seasonal items, or a dangerously big glass bottle collection. 😉

vintage credenza gone media console looks so good with all those rescued brown glass bottles!

If you’ve got a spare closet in your living room space you can convert it to a totally functional mudroom space. Even if you don’t have school age children, having a mudroom space is super practical. Books, backpacks, jackets- basically anything you may need before leaving you home can be stored neatly and out of sight here. And then at the end of the day, it’s a neat place to hide away those things, too. Kim from Hunt & Host shared how she converted her spare closet into a mudroom space. It’s so functional and organized. Hooks in a closet is much more practical for me. I do not like battling with a hanger at the end of a cold day.


Another really fabulous idea for families with students is this door organizer. It corrals all those related items into one central location. But obviously is makes a really great utensil station, too! Jamie shares a really great school organization post covering how to use a simple door as a fun way to get organized. All you need is a small section of wall and you’ve got a great spot for storage in the living room.

A really great idea is to use interesting accent furniture with drawers and/or doors. Like this apothecary cabinet in Mandi of Vintage Revivals’ Lofty living room. You could store all sorts of amazing craft supplies in those drawers. Or kitchen utensils. Or DVDs/pictures/etc.

Maximize an empty wall by making custom built ins. Not only will you maximize all that vertical space, but holy hidden storage! You don’t have to clean under it and it’s custom to fit your needs. Check out all the cabinets in this built in Entertainment Center from Danielle of DIY Danielle.

I think we can all agree that taking an idea from Emily Henderson is probably the best move. This campaign dresser is stunning, but it’s also totally practical. Again, taking a beautiful accent piece that doubles as a hideaway for all the unsightly things is a great way to go. This also frees up possibly needed end table storage so she could use this swanky metal wire one. The combination is perfection. Check out all the beautifulness from her Living Room Reveal.


I love Jen’s idea for making over a dresser and using it for non clothing storage. The drawers conceal the art supplies but they aren’t so deep that art supplies get lost in the depth of the drawer. Jen shared the transformation for this dresser on her blog Fresh Crush.


Michael from Inspired by Charm always has a plethora of good ideas. But I was especially inspired by the built in bookcase shown here in the living room. Even open storage is great storage- for pretty things and unsightly things within baskets and boxes. The whole space can be seen in his post about changing the wall color of this space.

Lory from Designthusiam recently shared a post highlighting 4 reasons you should use your living room. She mentioned that the piece below serves well for holding thank you notes and stationary. That’s such a good idea! And a piece like this would work really well for those of use who move from space to space trying to find the right inspiration for our work. The drawers also function to hold gift wrap amongst other things. And it folds up to be out of sight when not in use.


Naturally I can’t avoid finding reasons to share beautiful spaces. Here’s another one shared by A Cup of Jo- Brooklyn Home Tour. I’ve always been infatuated with the idea of lining a wall with bookcases. If you can afford to bump out your couch about a foot, why not place some bookcases behind it? The hidden shelves can hold seasonal items and the visible shelves can hold pretty things and more in boxes and baskets. The whole home is absolutely stunning and full of really great ideas.

And last but not leave, wall mounted shelves are a great way to have full control over every element. From style to function to little things like, “how low can I go before my little kid can use this as a ladder?” kind of control. I created these shelves for my living room by “hacking” the IKEA Ekby Lerberg brackets. I’ll have the tutorial for them up next week!

catch a tutorial for these oh so boho shelves at A Designer At Home

I hope you’ve found this post helpful and interesting. If you have anything to add to the list, please leave it in the comments below! Leave a link if you have one if you want the tip to be included in Part 2!

Filed Under: Decorating, Living Room, Organization Tagged With: living room organization, living room storage, school organization

  • « Go to Previous Page
  • Page 1
  • Interim pages omitted …
  • Page 63
  • Page 64
  • Page 65
  • Page 66
  • Page 67
  • Interim pages omitted …
  • Page 72
  • Go to Next Page »

Primary Sidebar


My name is Corinna and I'm a Gemini. Enamored with the architecture and textiles of South Asia. Lover of incense, the color teal and thrifting. Supporter of small businesses and fair trade. Self proclaimed crazy plant lady. Aiming to live a more natural, vegan life day by day. I read, hike and drink coffee in my spare time. I have 2 cats, a dog and a 4 year old.

Subscribe To My Newsletter

Enter your email to begin receiving a once monthly handwritten email containing updates from the blog as well as tips, freebies and announcements.

Reader Favorites

Designing A Multitasking Bedroom

10 Most Stylish Mirrors

10 of the most stylish mirrors ever

Tips Bohemian Chic Style Textiles

Tips for Bohemian Chic Style Textiles

2018 Blogger Spring Home Tour- Fresh Boho Style

Fresh Boho Spring Home Tour

Boho Botanical Spring Tablescape

Categories

Friends Of A Designer At Home

Thoughts from Alice

Networks


Wayfair Homemakers

More Posts

Autumn Bucket List (Things to do in Fall)

I can feel it coming in the air tonight… Autumn is nearly here! What a joy. I start to feel the excitement when the faint hint of crispness hits the air. Fall is my favorite season. There are so many great things to do in Fall. Somehow I always miss doing activities so this year […]

Starting LDN and everything else I’ve tried for CFS so far…

I’ve been taking low dose naltrexone (ldn) for just over a month at this point and I wanted to share an update on how it’s been going thus far. I started taking ldn because I tried everything else in an attempt to feel better. At my last PCP appointment, I told him I’d be trying […]

Checkerboard: The Latest Insta-Trend

You ever first see a trend and think, “nope, not for me.” That was, and still a little, me with the checkerboard trend. I’ve never liked checkerboard walls or floors. At least not enough to semi-permanently put it somewhere in my home. But I am still in pursuit of an interior design certificate and job […]

My best Amazon Prime Purchases Ever

I’m sure you don’t need me to tell you that it’s time for Amazon’s annual Prime day. And you likely don’t need me to tell you about my best Amazon Prime purchases ever. But I’m telling you, these are such good products and I got them for a steal too!

Celebrating Pride Month With LGBT Businesses

Part of mindful consumerism, for me at least, is intentionally seeking out companies founded and owned by marginalized communities. Heritage and pride months are the perfect reminder to seek out alternative sources for goods and services. Join me in celebrating pride month with LGBT businesses below.

AAPI Skincare & Beauty Haul & Demo (dry skin, fragrance sensitive)

As my mental health has improved, I’ve enjoyed getting back into my mindfulness consumerism series. With AAPI month upon us, and quickly coming to an end, I took stock of what I needed to purchase and set out to buy replacements from AAPI skincare and beauty brands. I needed face wash, serum, and oil. For […]

Simple Minty Eye Makeup Look (Indigenous Beauty Brands)

As much as I loathe dealing with fallout atop base makeup, I still always start with base makeup. But lucky for me, there’s no powder products going on my eyes today. Despite being a simpler makeup look, there’s still a lot of drama going on. A sharp cat eye winged liner elevates the eyes. And […]

Indigenous Owned Shopping Faves

You’re shopping. Here’s everything you need to be shopping for from indigenous owned brands. From beauty to fashion to accessories and body care, these products are top tier. These may be my indigenous owned shopping faves, but they’re quality from design to ingredients to workmanship.

Full Face Latinx Brands

From September 15 – October 15 is Hispanic Heritage Month. During this time I wanted to put together a full face of Hispanic owned beauty brands. Some of these brands are well known and others are smaller brands. I tried to find a balance of big name beauty brands and up and coming. After testing […]

Here’s My Faves for Hispanic Heritage Month

Hispanic Heritage Month is upon us! It’s always my goal to be mindful of where I’m spending my money. During Heritage and Pride months, I try to make an effort to seek out brands that I may not otherwise be aware of. It’s no surprise, what’s out there is truly amazing. And I want to […]

  • Home
  • Design Advice
  • DIY Projects
  • Room Inspiration
  • About
    • Contact
    • Sponsorship
    • Policies
  • Shop

Recently

downloadable chinese free art prints

Chinese free art prints

One of the fastest and easiest ways to decorate a wall is with free art prints. There are literally endless themes and colors. The free art prints I’m sharing today are all Chinese themed. Incorporate Chinese free art prints for the lunar new year. Or create a long term decorative destination. Wherever and whenever these […]

The Year of 25 Projects

The Year of 25 Projects

For the past few years, I’ve wanted to start the year with a list of home projects. These are projects I want to accomplish in the upcoming year. However, something always distracts me, and I end up not following through. Things have been going smoothly for the past six months, and I believe I’m finally […]

DIY Lunar New Year Decorations

Make It DIY Lunar New Year Decorations

Lunar New Year, aka Chinese New Year, is a celebration of the beginning of the lunisolar Chinese calendar. If you didn’t know, there are many calendars throughout the world. This is my first year celebrating Chinese New Year. I felt inspired and creative so I made DIY Lunar New Year Decorations. I just had to […]

The Useful List Of Practical Gifts

Sure, Valentine’s day is on the horizon but there’s seemingly always some reason to need a gift. Therefore I bring you a timeless, useful list of practical gifts. Some, if not all, of these gifts can be used and appreciated all year long. Even better, they’re all around $35. It’s a gifting win-win-win. You win, […]

Honoring Indigenous People for Heritage Month

I am sitting here, stuck, trying to come up with the best way to honor Indigenous People for this year’s Native American Heritage Month. While not indigenous myself, I do live on their land and benefit from work they’ve done. I want to give back communities that I admire and respect. Therefore, I want to […]

Dark Halloween Art Print Collection

If you’ve seen some of my recent blog posts, you know I love temporary seasonal art. This time I wanted to share a dark Halloween art print collection. It is spooky season after all! I believe this collection is the one I’ve spent the most time on. Halloween is my favorite and that’s made it […]

Instant Autumn Art Print Collection

Recently, I shared a collection of free dark autumn art prints. For those into a brighter aesthetic, I wanted to also share an instant autumn art print collection with brighter colors and themes. This collection features scenery, colors, flora and fauna analogous with Fall. If you appreciate easy and free decorating, you’re in the right […]

Is it safe to buy makeup on Poshmark? Testing makeup.

Is it safe to buy makeup on Poshmark?

You probably know that you can buy clothing and accessories on Poshmark, but did you know you could buy makeup, too? I was skeptical when I first came across this. Is it safe to buy makeup on Poshmark? I had to know. So, I placed several orders, with several different sellers, and I’ve had a […]

Dark Autumn Art Print Collection

Autumn decorating season is upon us. Have you started? I don’t have much up yet but I have been collecting things to put up. Usually for seasonal decorating, I go for creating a vibe. I feel like Fall can go two different ways. The first, warm and vibrant. The second, moody and dark. Today I’m […]

Autumn Bucket List (Things to do in Fall)

I can feel it coming in the air tonight… Autumn is nearly here! What a joy. I start to feel the excitement when the faint hint of crispness hits the air. Fall is my favorite season. There are so many great things to do in Fall. Somehow I always miss doing activities so this year […]

Keep Reading...

@Instagram

Subscribe