Greetings friend. Thank you for being here. Dismiss

  • Skip to primary navigation
  • Skip to main content
  • Skip to primary sidebar

A Designer At Home

Designing Beautiful Spaces. Inspiring Authentic Living. Spreading Good Vibes.

  • About
  • Policies
  • Sponsorship
  • Shop
  • Contact
  • Blog
  • About
  • Policies
  • Sponsorship
  • Shop
  • Contact
  • Blog

Blog

How I Made It: IKEA Rast Hack to West Elm Stria Knock Off

August 26, 2015 by CORINNA HENDERSON

IKEA RAST Hack to a West Elm Stria Dresser KNOCK OFF

Hey Guys!

I love West Elm, but it’s not always in my budget to buy new furniture. Well actually, it’s never in the budget to buy new furniture, especially when it comes with the price tag that West Elm comes with. But it can be really easy to get “the look” without buying from the retailer you’re loving. Hacks are great! And I’ve got one of my own to share. The IKEA Rast is the perfect candidate for any hack. For my nightstands, I wanted to replicate the look of the West Elm Stria dresser. In the tutorial below I’ll share with you how I created them- I think you’ll like it!

The cost savings to create the dresser from scratch is insane! Though it is slightly smaller than the 3 drawer dresser from the Stria series, it is also significantly larger than the nightstand from the series. The nightstand is also only a 2 drawer (and $349). Call it what you want!

IKEA RAST Hack to a West Elm Stria Dresser KNOCK OFF

IKEA Rast Hack to West Elm Stria Knock Off

I started with a road trip to IKEA. Our nearest IKEA is 2.5 hours away. But, I’ve wanted to go for years now. And I needed a real wood 3 drawer dresser for cheap. I could’ve waited around for Craigslist to produce something, but I wanted to finish this project in a short period of time.

(Enter IKEA Rast dresser from stage left)

IKEA Rast Hack to West Elm Stria Knock Off ( A Designer At Home)

It took about an hour to put the two together that night. It was an easier process than any of the cheap Walmart and Target furniture I’ve bought.

The next morning was Saturday and it was BEAUTIFUL out. The little guy and I ate breakfast in the yard and played a while. A short while later, he lost interest in me and got to exploring the yard. I took the opportunity to stain the dressers (“Special Walnut”, I like that it has less red undertones unlike the Stria, but since it’s a DIY it could be any!).

stain-ikea-rast-dresser-west-elm-stria-knock-off-hack-nightstand

Later that afternoon, Hubby volunteered to come with us to Lowe’s so I could get wood for the drawer fronts. I found what was called “craft wood” that came in perfect 24 inch length pieces. I also picked up a few of the 48 inch long pieces because they came in thicker pieces. I bought 3/8 x 2 x 24, 1/2 x 2 x 24, 3/8 x 3 x 24, 3/8 x 3 x 24, 1 x 3 x 48, and 1 x 4 x 48.

IKEA Rast Hack to West Elm Stria Knock Off ( A Designer At Home)

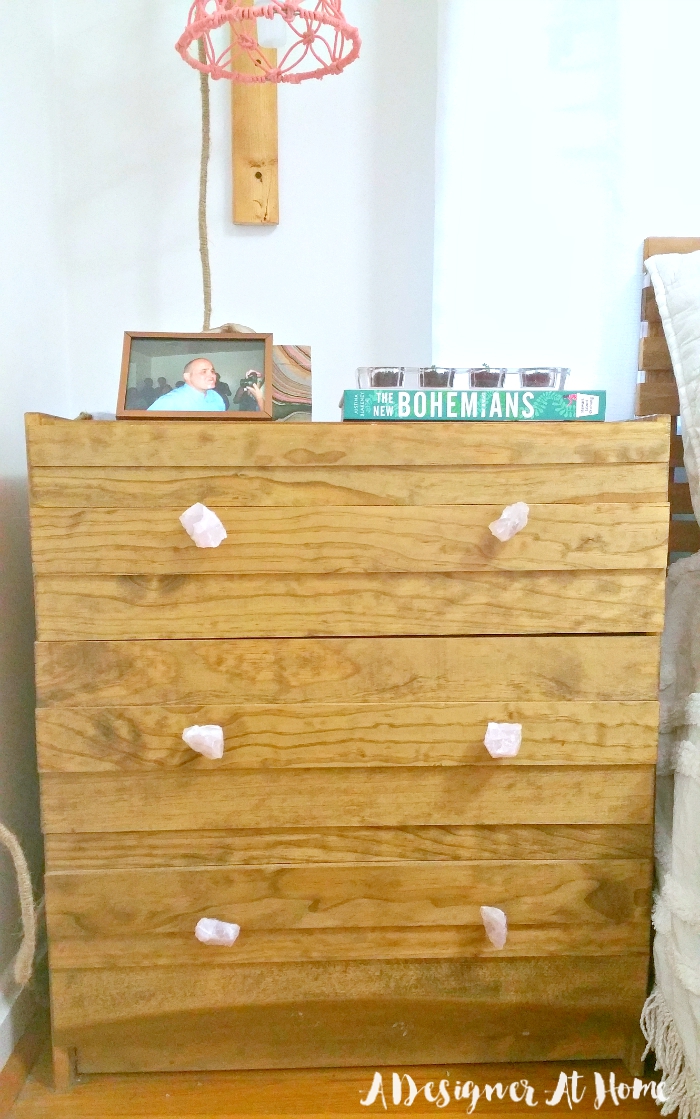
That night I laid wood glue on the drawer front, stained the pieces of wood (hubby cut the 48 inch long pieces in half), and pressed them into the wood glue. The middle drawer was covered with exactly 7 inches width worth of wood. The top drawer was cover with 8 inches width worth of wood leaving leftover to cover the dresser top that shows from the front. And the bottom drawer used 11 inches width worth of wood to cover most of the gap at the bottom of the dresser.

ikea-rast-hack-west-elm-stria-knock-off-wood-glue-craft-board

I didn’t use any nails or screws. The wood seems to be bonded pretty well. The extra weight also seems to have no negative effect on the function of the drawers. WIN!

IKEA RAST Hack to a West Elm Stria Dresser KNOCK OFF

They’re great for nightstands in our bedroom because our bedroom is very small and the closet is even smaller. We need loads of little places to store things.

bedside-table-nightstand-made-from-ikea-rast-chest-hack-west-elm-stria-knock-off

If you’re wondering about the knobs, stay tuned! I’ll have the tutorial for those up next Monday!

If you enjoyed this knock off, I would sincerely appreciate a share, like, or pin! You may just save someone a couple hundred dollars! 😉

Filed Under: Blog, DIY Tagged With: how to hack, ikea hack, ikea rast hack, rast chest, rast dresser, stria replica, west elm knock off, west elm stria knock off

Tour: Boho Vintage Eclectic Bedroom

August 24, 2015 by CORINNA HENDERSON

boho-bedroom-elephant-tapestry-houseplants-bohemian-patterns-painting-wall-hanging-a-designer-at-home

Hey Guys!

Today I’m happy to be sharing the second space I’ve designed in my home- the “Master” Bedroom. It’s a pretty tiny space, but I’ve managed to fit a dresser, two nightstands, a queen bed and plant life. I’ve used some vintage pieces and I’ve used store bought pieces that I’ve DIYed a little magic into. I get so happy when I see pictures of this space because it came together so well. And while there’s things I could change, I’m actually really happy and feel “complete” with this room.

I like to call the style of the space “Bohemian with order.” Because I lean both way with my personality, this design appeases both the type A and type B in me. I love fun patterns with a clean pallet. A moroccan wedding blanket wall hanging structured by a square painted frame (but still messy with it’s paint technique). Whimsical cacti tapered candles paired with refined vintage brass candleware. Crystal drawer knobs with clean copper frames. There’s a strict and intentional balance to keep the room feeling fresh and playful.

As I like to do with a “room reveal” kind of post, I’m going to keep chit chat to a minimum. I’ll have several week’s worth of tutorials, “crushing on” posts for elements within the room, source list, and tips. If you’d like to catch any of those posts, become an email subscriber. It’s the easiest way for me to ensure you receive notification of a new post when it’s posted. You can sign up here.

succulent-babies-in-glass-tea-light-holder-atop-the-new-bohemians-bohemian-nighstand-in-boho-bedroom-a-designer-at-home

Let’s dive into le tour:

bohemian-bedroom-decorating-decor-inspiration-diy-tutorial-room-receal

two-layered-headboard-ikea-hack-tarva-headboard-mid-century-inspired-white-curtains-ikea-nightstand-hack-west-elm-stra-macrame-lamp-diy-boho-eclectic-bedroom-decorating

Bohemian Master Bedroom in a Small Home- Room Reveal (lots on DIY and vintage finds!)

Bohemian Master Bedroom in a Small Home- Room Reveal (lots on DIY and vintage finds!)

Bohemian Master Bedroom in a Small Home- Room Reveal (lots on DIY and vintage finds!)

Bohemian Master Bedroom in a Small Home- Room Reveal (lots on DIY and vintage finds!)

Bohemian Master Bedroom in a Small Home- Room Reveal (lots on DIY and vintage finds!)

Bohemian Master Bedroom in a Small Home- Room Reveal (lots on DIY and vintage finds!)

Bohemian Master Bedroom in a Small Home- Room Reveal (lots on DIY and vintage finds!)

Bohemian Master Bedroom in a Small Home- Room Reveal (lots on DIY and vintage finds!)

Bohemian Master Bedroom in a Small Home- Room Reveal (lots on DIY and vintage finds!)

Bohemian Master Bedroom in a Small Home- Room Reveal (lots on DIY and vintage finds!)

Bohemian Master Bedroom in a Small Home- Room Reveal (lots on DIY and vintage finds!)

Bohemian Master Bedroom in a Small Home- Room Reveal (lots on DIY and vintage finds!)

Bohemian Master Bedroom in a Small Home- Room Reveal (lots on DIY and vintage finds!)

Bohemian Master Bedroom in a Small Home- Room Reveal (lots on DIY and vintage finds!)

Bohemian Master Bedroom in a Small Home- Room Reveal (lots on DIY and vintage finds!)

Bohemian Master Bedroom in a Small Home- Room Reveal (lots on DIY and vintage finds!)

Bohemian Master Bedroom in a Small Home- Room Reveal (lots on DIY and vintage finds!)

Bohemian Master Bedroom in a Small Home- Room Reveal (lots on DIY and vintage finds!)

Bohemian Master Bedroom in a Small Home- Room Reveal (lots on DIY and vintage finds!)

Bohemian Master Bedroom in a Small Home- Room Reveal (lots on DIY and vintage finds!)

Bohemian Master Bedroom in a Small Home- Room Reveal (lots on DIY and vintage finds!)

Bohemian Master Bedroom in a Small Home- Room Reveal (lots on DIY and vintage finds!)

Bohemian Master Bedroom in a Small Home- Room Reveal (lots on DIY and vintage finds!)

Bohemian Master Bedroom in a Small Home- Room Reveal (lots on DIY and vintage finds!)


Bohemian Master Bedroom in a Small Home- Room Reveal (lots on DIY and vintage finds!)

Bohemian Master Bedroom in a Small Home- Room Reveal (lots on DIY and vintage finds!)

Bohemian Master Bedroom in a Small Home- Room Reveal (lots on DIY and vintage finds!)

Bohemian Master Bedroom in a Small Home- Room Reveal (lots on DIY and vintage finds!)

Bohemian Master Bedroom in a Small Home- Room Reveal (lots on DIY and vintage finds!)

Bohemian Master Bedroom in a Small Home- Room Reveal (lots on DIY and vintage finds!)

Bohemian Master Bedroom in a Small Home- Room Reveal (lots on DIY and vintage finds!)


Bohemian Master Bedroom in a Small Home- Room Reveal (lots on DIY and vintage finds!)

Bohemian Master Bedroom in a Small Home- Room Reveal (lots on DIY and vintage finds!)

Bohemian Master Bedroom in a Small Home- Room Reveal (lots on DIY and vintage finds!)

Bohemian Master Bedroom in a Small Home- Room Reveal (lots on DIY and vintage finds!)

Bohemian Master Bedroom in a Small Home- Room Reveal (lots on DIY and vintage finds!)

Bohemian Master Bedroom in a Small Home- Room Reveal (lots on DIY and vintage finds!)

Bohemian Master Bedroom in a Small Home- Room Reveal (lots on DIY and vintage finds!)

Bohemian Master Bedroom in a Small Home- Room Reveal (lots on DIY and vintage finds!)

Bohemian Master Bedroom in a Small Home- Room Reveal (lots on DIY and vintage finds!)

Bohemian Master Bedroom in a Small Home- Room Reveal (lots on DIY and vintage finds!)

Bohemian Master Bedroom in a Small Home- Room Reveal (lots on DIY and vintage finds!)

And that’s the end of the tour! I’d be so appreciative if you’d give this room reveal a share. Thank you for being here and stay tuned for DIY’s, tutorial, helpful tips, and more!

Filed Under: Blog, Home Files, Master Bedroom Tagged With: bohemian, boho bedroom, boho eclectic, budget, coral decor, decor, macrame lamp, moroccan bedding, room reveal, small bedroom, tribal rug, whimsical decorating

How To Paint A Hexagon Patterned Wall

August 19, 2015 by CORINNA HENDERSON

ombre painted hexagon patterned accent wall - A Designer At Home

Hey Guys!

Today is a bit of a throwback post. I don’t actually have a hexagon painted wall in my Living Room. But it was one of the first big things I did in my home. I loved it and still love it. Hexagons will always be a trend within home decor. And if you love a loud accent wall, a honeycomb inspired accent wall is definitely a fabulous way to go. If I were to undertake this task again, I would choose easier to work with colors since that was ultimately what caused me to paint over it. Seriously though, you can’t get a cooler patterned painted wall!

If you’ve followed me since before the creation of A Designer At Home, you’ll have seen this on my old blog. I had a few friends ask for the details on how I created my Living Room Hexagon Wall and happily obliged with the tutorial. Since it’s been so popular, I wanted to make sure I brought the tutorial here. In this post I will show you everything from how I made the stencil (Yes! you can make the stencil!) to how I taped our the pattern to how I created and painted the custom ombre colors. I hope you’ll be forgiving of the not-so-forgiving stencil video!

For this project, you’ll need:

  • Cardboard (at least slightly larger than the size Hexagon you want)
  • Marker
  • Pointed object ( like a mechanical pencil)
  • String/Wire (something to hold the marker to the pointed object at an even distance)
  • Painter’s tape
  • Paint
  • Painting supplies (rollers, brushes,etc.- personal preference)
  • Box cutter
  • Level
  • Old Tupperware

To start, make sure your wall is ready for the stencil. Color preference is personal, but make sure that whatever color you want to be the outline to the hexagons, you will want to paint the whole wall this color. Also note that if you want a dark outline, you should prime the hexagons before painting them their final color. You will need to do this a few days before painting the hexagons, you’ll compromise the final product if you don’t give it the proper amount of time to dry.

Paint Base color

To create the stencil, something inside me felt like I should make a video to show how it’s done. There’s technically math involved, but it doesn’t feel like it if you just watch-

So to explain what I wasn’t saying- Place a flat piece of cardboard, larger than the size hexagon you want, onto a surface that’s safe to be cut on. Take your pointed object and connect it to your marker. the distance between the two is your radius- the halfway distance between the widest width of your hexagon. Place your pointed object firmly near the center of your cardboard and draw a circle around the pointed object. Now here’s some math- the radius of your hexagon is also the length of each side of the hexagon. Cool, right? So you just need to keep the pointed object and marker at the same distance and just mark that distance around the circle. Connect those marks and those are your 6 sides! Because of the nature of the string/wire, marker, and cardboard, this will not be a “perfect” Hexagon but it will be very close. Cut out the marks with a box cutter and pop out!

tape first hexagon onto wall, use a level to make sure it's straight

Now that you have your stencil, eyeball the “center” of the wall you’re painting. Use a bit of painter’s tape to hold it up. Check to make sure it’s level with your level. Start taping! Honestly, it’s not necessary to be precise. Start by taping around the first hexagon, remove your stencil and line it up with the first. Then tape around the second.

adding additional hexagons to wall

Every so often you will need to check to make sure everything is still level, just do this every 4 or 5 hex’s. Repeat until your wall is covered. Hexagons are a very forgiving shape and it’s not noticeable if there are imperfections throughout. Because of this, you can eyeball around the walls and floors if a full hexagon doesn’t line up. You can also leave those Hexagons for last and cut your stencil to fit. I did a little bit of both.

check everything is level

If you have walls or a doorway, work your stencil around them, then worry about fitting pieces of hexagons tightly around the frame. If the majority of the Hexagons are even and level, the slightly wonky ones will not stand out.

mixing paint for ombre

Mixing paint can be a little daunting. But it’s seriously easy and seriously fun. Start with one color you absolutely LOVE. Then keep 1, 2 or 3 other colors that mix well with it. I used leftover grey and white. Mix little by little in plastic containers you wouldn’t mind ruining. The point is to be a little ombre with it, so if you don’t have enough to do as many hexagons as you want, mix in a little more of whatever you already have mixed. It will likely be a new color but it’ll be a variation of your main color and that’s what’s important! You have to be a little nonchalant with this project, it can really turn into a tedious task if you don’t!

Paint random hexagons for ombre effect

Peel off the painters tape and let the paint dry. This is the perfect time to grab a cup of coffee/tea and bask in the awesomeness you’ve created.

painted hexagon ombre wall treatment honeycomb accent wall ombre painted design

At this point you can stop and be merry, but I like to spend some time trying out a few things in front of my new wall.

If a Hexagon wall speaks to you, I hope you find this tutorial useful. I’ve tried to include as much information as possible. If you do have any questions, please leave them in the comments so I can do my best to get them answered.

Filed Under: Blog, DIY Tagged With: hexagon stencil, hexagon wall, honeycomb wall, how ot paint hexagons, painted walls, wall treatments, ways to paint walls

Tiled Flip Top Ottomans

August 17, 2015 by CORINNA HENDERSON

thetiledoctorsponsordisclosure
blue grout with natural stone mosaic tiles A DESIGNER AT HOME

Hey Guys!

Today it’s going to be a bit of an intermission from what I’ve normally got to share here. I wanted to share with you how I took my Mom’s old flip top ottoman’s and brought them back to life. Flip top ottoman’s are really fabulous and versatile pieces of furniture. But they’re normally not made of quality materials. The “leather” rips and tears easily and the tray’s normally start to warp at the first sign of liquid.

I don’t own any of these flip top ottomans, but my mom does and they’re quite old and a bit damaged. When The Tile Doctor offered to send me some of their fashionable grout- yes, fashionable – it wasn’t my first idea to tile flip top ottomans. But after freaking out a lot over major problems with our DIY bathroom remodel, I thought long and hard about what I could tile that wouldn’t involve tearing up anymore floors in my own home. And that’s when it occurred to me that I owe one to my mom.

tiling a flip top ottoman sounds super easy and makes sense! they see so much water damage


Materials:

  • STAINMASTER® Glamour Grout (1 tub was more than enough for 3 ottoman tray tops for me)
  • Grout Float
  • Mixing Tool and Drill
  • Grout Sponge
  • Flip Top Ottoman
  • Construction Adhesive
  • Tile (I used 4.5 sheets of mosaic tile)

Helpful Pre-Installation Videos:

  • Using STAINMASTER Grout in Your Tile Installation
  • Tile Floor Installation

(I’m sorry but all of my during shot files were warped and unusable!)

I started off by wiping down the ottomans to remove any debris and gunk. Then I painted on a thick layer of construction adhesive. I chose construction adhesive for a lot of reasons. I had a horrible time working with thinset in the past and I don’t think it’s the right application onto a veneered surface. Then there’s the dry time. I didn’t have 24 hours to wait. Right or not, the tiles aren’t budging- but choose the adhesive you’re most comfortable with using with your own research.

Press the tiles into the adhesive and give proper amount of time to dry.

Then mix the grout. There’s no water involved in mixing. There’s a lump of the grout stuff and a pack of an additive. Mix the packet into the grout lump until a peanut butter consistency.

Use a grout float to press and slide the grout between the tiles. 30 minutes later, you’ll need to come back in with a grout sponge and water to wipe the residue off the top.

flip top ottoman tray tiled to protect warping veneer


They’re calling the grout “fashionable,” which I think is especially cute. There are lots of different colors to choose from and additives that give a sparkly appearance. You can check out the colors and different additive options on the STAINMASTER® Glamour Grout Colors page. There’s also a fun video about it on YouTube.


My mom and I really love the effect of the Tuscan-like tile mosaic paired with the aqua colored grout. There really are so many options to using the colored grouts with any kind and color of tile. Check out their fun video about it linked earlier to get inspiration!

blue grout with natural stone mosaic tiles

flip top ottomans are great triple function furniture especially when tiling the trays because they wear better with use

I hope you’ve enjoyed this how-to. Let me know if you have any questions and please be sure to leave a comment and give this post a share before you go. It helps me out a lot :). If you enjoyed this post, maybe you’d enjoy the others, too? Check out the project gallery and archives for more from A Designer At Home. Have a great day!


Filed Under: Blog, DIY Tagged With: blue grout, how to tile furniture, mixing mosaic tile and colored grout, stainmaster, the tile doctor, tiled ottoman, tiled tray, turquoise grout

Future Plans for the Living Room

August 14, 2015 by CORINNA HENDERSON

future plans for the living room on a designer at home

Hey Guys!

I’m sure it’s a feeling you’ve felt before. Perhaps you even feel it all the time. You’ve decorated a space, announced it as done, but know there are a ton more things you want to do with it. Or maybe you don’t ever declare it done because you have all those other things running through your mind. That was me up until recently. Over the course of the past month I’ve taken you through my living room. I’ve shown you the furniture in there, the things I’ve made, and some tips and ideas along the way. But the space has been far from done. And, if I’m going to be completely honest, I’ve already been switching things up. I’m not going to spend eternity talking about and focused on one room though. Especially since we’ve begun a bathroom renovation that I hope to be sharing with you in the Fall.

The next finished space I want to share with you in our main bedroom. There is no master bedroom in the space so it’s the “biggest bedroom,” but before I get there I wanted to talk a little about my future plans for my own living room. I don’t know about you, but I personally feel a bit relieved when I write or type down my ideas. It gets them out of my head and into a place I can reference back to later. This is that space and that’s what I’m doing.

One thing I’ve already done is flip the layout. So if you see picture on Instagram of Facebook and you’re wondering why it looks different than what I’ve “revealed” here, that’s why. But, like I said, let’s not beat a dead horse and just know that the couch and TV has switched spots.

Behind the sofa I really want a console table. I’ve played around with the idea of using a simple system with a plank of wood and shelf brackets. What I really want to do, and what I’m aiming for, is to line that bit of wall with short bookcases so I can style the top, have seasonal decor storage behind the sofa, and have space for more books and toys on the shelves that hang out on either side of the sofa.

Just Imagine: Bohemian Decor

I also really want a tall campaign style lingerie chest/tall dresser. I’m obsessed with storage and ages ago when I saw my idol, Emily Henderson, put one in her living room, I knew I had to do the same.

Emily Henderson's Living Room
Emily Henderson’s Living Room

I’ve probably mentioned it before, but my dream is to take down or open up the wall between the living room and kitchen. My gallery wall would have to go (not nearly as sad about that as that may have come off), but I think a nice island or peninsula here would make a really great family interaction flow.

Southern Living: Designer Amie Corley

Underneath the large wall of windows I have a gold bar cart. I think it looks a little silly in size in this spot and I’d like to pick up something more scale appropriate for the wall. Maybe even adding in more seating with a loveseat or sofa (vintage, of course, and awesome, of course). Or a trunk for more toys?

Sneak Peek: Julia Okun of Rennes on Design*Sponge

I’ve been stuck on the fence over my sofa situation. I LOVE my sofa. Like, a lot. But I also really love the look of a plush sofa covered with drop cloth or loose fabric or a coverlet. I picked up a coverlet a while back for this purpose but I can’t do what I want with my current living room sofa. But I could with the one I’ve banished to the garage (it’s mint in color and absolutely destroyed with stains from the little one, irrelevant if I’m covering it up though). I find both to be comfortable, it’s really just the aesthetic I’m struggling with.

Apartment Therapy: Rohde's "Opportunistic" Design Laboratory
Apartment Therapy: Rohde’s “Opportunistic” Design Laboratory

Do you own a vittsjo shelf? I’m obsessed with their simplicity. I had always planned on putting one in our only bathroom, but it’s a tight squeeze in there already. So I’m thinking of flanking our credenza with two of the skinny units. More space to decorate, more storage, and it fills up blank wall? Where’s my credit card… I think I’d want to give them a finish like the shelves below have.

Irene Neuwirth's home via Mix and Chic blog.
Irene Neuwirth’s home via Mix and Chic blog.

And one final idea for the space: Right now I have the bentwood rocker in the corner of the living room. I never wanted it in the first place but had to buy it for the bentwood foot stool I actually wanted. So I’m going to clean it up and put it on craigslist (email me if you’re interested!). I’ve got a rattan armchair I’m going to pull in that I had banished because I didn’t like it’s cushions until I threw a Mexican blanket over it. Thank God I hoard things I sporadically love and hate, amiright?

So that’s where I’m going to wrap things up with the Living Room. The only other space I’ve decorated is the “main” bedroom, so I’ll start sharing that next! And then we will hopefully be ready to start chatting bathrooms! We’ve already started demo but it’s going very slowly… Have a great day!

Filed Under: Blog, Home Files, Living Room

How I Made It: Copper Dipped Planter

August 3, 2015 by CORINNA HENDERSON

How to make a copper dipped glass planter- looks really pretty paired with the green of the plant!

Hey Guys!

If there’s one thing you could take away from quickly skimming my blog, you’ll see that I love quick and easy upgrades to boring pieces, especially planters. Last week I shared how I took a boring planter from “nah” to “awesome!” with simple tape, today I want to share with you how to embellish a simple glass container to give it the appearance of “dipped in copper.” It’s a really cool finish and compliments greenery really well.

copper dipped planter

How To:

I simply filled the inside of the glass container with balled up newspaper/old magazines/phone book pages, taped off a line with painter’s tape that looked like a dip line, and taped newspaper over the side I didn’t want to have a copper finish.

I gave it a couple layers of my favorite Copper Spray Paint (Ace Hardware brand Metallic Spray Paint in the Copper shade). I like this spray paint for copper because it has pink undertones instead of red, yellow or brown like most others. The next day it was dry enough to move onto filling the bottom with river rocks. I placed the plant atop the rocks and filled everything with soil.

The plant I’m using is affectionately called a Mother in law’s tongue. I’ve got a baby that I picked up for a couple of dollars at Lowe’s. These plants are so good for the home and extremely black thumb hardy. They grow very tall in time. The glass bowl that I’m using is from walmart- super inexpensive and perfectly snazzy with a dose of copper!

copper dipped glass container- i can do this, i need this!

Little touches like this mix so well with vintage items and collections. My favorite pairing is metal and wood and I love that we can incorporate a pop of metallic with a simple can of spray paint. DIY is pretty fun, amiright?

industrial bohemian shelves

really cute bohemian house with lots of handmade touches

I hope you’ve found today’s post interesting and helpful. I would really appreciate it if you gave this post a share- it really helps me out a lot. What’s your favorite easy way to jazz a boring piece up? 

Filed Under: Blog, DIY Tagged With: color block, copper dipped, copper dipped planter, copper diy, copper paint craft, copper planter, copper spray paint, how to paint something to look like it's dipped, planter tutorial

  • « Go to Previous Page
  • Page 1
  • Interim pages omitted …
  • Page 54
  • Page 55
  • Page 56
  • Page 57
  • Page 58
  • Interim pages omitted …
  • Page 63
  • Go to Next Page »

Primary Sidebar


My name is Corinna and I'm a Gemini. Enamored with the architecture and textiles of South Asia. Lover of incense, the color teal and thrifting. Supporter of small businesses and fair trade. Self proclaimed crazy plant lady. Aiming to live a more natural, vegan life day by day. I read, hike and drink coffee in my spare time. I have 2 cats, a dog and a 4 year old.

Subscribe To My Newsletter

Enter your email to begin receiving a once monthly handwritten email containing updates from the blog as well as tips, freebies and announcements.

Reader Favorites

Designing A Multitasking Bedroom

10 Most Stylish Mirrors

10 of the most stylish mirrors ever

Tips Bohemian Chic Style Textiles

Tips for Bohemian Chic Style Textiles

2018 Blogger Spring Home Tour- Fresh Boho Style

Fresh Boho Spring Home Tour

Boho Botanical Spring Tablescape

Categories

Friends Of A Designer At Home

Thoughts from Alice

Networks


Wayfair Homemakers

More Posts

Autumn Bucket List (Things to do in Fall)

I can feel it coming in the air tonight… Autumn is nearly here! What a joy. I start to feel the excitement when the faint hint of crispness hits the air. Fall is my favorite season. There are so many great things to do in Fall. Somehow I always miss doing activities so this year […]

Starting LDN and everything else I’ve tried for CFS so far…

I’ve been taking low dose naltrexone (ldn) for just over a month at this point and I wanted to share an update on how it’s been going thus far. I started taking ldn because I tried everything else in an attempt to feel better. At my last PCP appointment, I told him I’d be trying […]

Checkerboard: The Latest Insta-Trend

You ever first see a trend and think, “nope, not for me.” That was, and still a little, me with the checkerboard trend. I’ve never liked checkerboard walls or floors. At least not enough to semi-permanently put it somewhere in my home. But I am still in pursuit of an interior design certificate and job […]

My best Amazon Prime Purchases Ever

I’m sure you don’t need me to tell you that it’s time for Amazon’s annual Prime day. And you likely don’t need me to tell you about my best Amazon Prime purchases ever. But I’m telling you, these are such good products and I got them for a steal too!

Celebrating Pride Month With LGBT Businesses

Part of mindful consumerism, for me at least, is intentionally seeking out companies founded and owned by marginalized communities. Heritage and pride months are the perfect reminder to seek out alternative sources for goods and services. Join me in celebrating pride month with LGBT businesses below.

AAPI Skincare & Beauty Haul & Demo (dry skin, fragrance sensitive)

As my mental health has improved, I’ve enjoyed getting back into my mindfulness consumerism series. With AAPI month upon us, and quickly coming to an end, I took stock of what I needed to purchase and set out to buy replacements from AAPI skincare and beauty brands. I needed face wash, serum, and oil. For […]

Simple Minty Eye Makeup Look (Indigenous Beauty Brands)

As much as I loathe dealing with fallout atop base makeup, I still always start with base makeup. But lucky for me, there’s no powder products going on my eyes today. Despite being a simpler makeup look, there’s still a lot of drama going on. A sharp cat eye winged liner elevates the eyes. And […]

Indigenous Owned Shopping Faves

You’re shopping. Here’s everything you need to be shopping for from indigenous owned brands. From beauty to fashion to accessories and body care, these products are top tier. These may be my indigenous owned shopping faves, but they’re quality from design to ingredients to workmanship.

Full Face Latinx Brands

From September 15 – October 15 is Hispanic Heritage Month. During this time I wanted to put together a full face of Hispanic owned beauty brands. Some of these brands are well known and others are smaller brands. I tried to find a balance of big name beauty brands and up and coming. After testing […]

Here’s My Faves for Hispanic Heritage Month

Hispanic Heritage Month is upon us! It’s always my goal to be mindful of where I’m spending my money. During Heritage and Pride months, I try to make an effort to seek out brands that I may not otherwise be aware of. It’s no surprise, what’s out there is truly amazing. And I want to […]

  • Home
  • Design Advice
  • DIY Projects
  • Room Inspiration
  • About
    • Contact
    • Sponsorship
    • Policies
  • Shop

Recently

downloadable chinese free art prints

Chinese free art prints

One of the fastest and easiest ways to decorate a wall is with free art prints. There are literally endless themes and colors. The free art prints I’m sharing today are all Chinese themed. Incorporate Chinese free art prints for the lunar new year. Or create a long term decorative destination. Wherever and whenever these […]

The Year of 25 Projects

The Year of 25 Projects

For the past few years, I’ve wanted to start the year with a list of home projects. These are projects I want to accomplish in the upcoming year. However, something always distracts me, and I end up not following through. Things have been going smoothly for the past six months, and I believe I’m finally […]

DIY Lunar New Year Decorations

Make It DIY Lunar New Year Decorations

Lunar New Year, aka Chinese New Year, is a celebration of the beginning of the lunisolar Chinese calendar. If you didn’t know, there are many calendars throughout the world. This is my first year celebrating Chinese New Year. I felt inspired and creative so I made DIY Lunar New Year Decorations. I just had to […]

The Useful List Of Practical Gifts

Sure, Valentine’s day is on the horizon but there’s seemingly always some reason to need a gift. Therefore I bring you a timeless, useful list of practical gifts. Some, if not all, of these gifts can be used and appreciated all year long. Even better, they’re all around $35. It’s a gifting win-win-win. You win, […]

Honoring Indigenous People for Heritage Month

I am sitting here, stuck, trying to come up with the best way to honor Indigenous People for this year’s Native American Heritage Month. While not indigenous myself, I do live on their land and benefit from work they’ve done. I want to give back communities that I admire and respect. Therefore, I want to […]

Dark Halloween Art Print Collection

If you’ve seen some of my recent blog posts, you know I love temporary seasonal art. This time I wanted to share a dark Halloween art print collection. It is spooky season after all! I believe this collection is the one I’ve spent the most time on. Halloween is my favorite and that’s made it […]

Instant Autumn Art Print Collection

Recently, I shared a collection of free dark autumn art prints. For those into a brighter aesthetic, I wanted to also share an instant autumn art print collection with brighter colors and themes. This collection features scenery, colors, flora and fauna analogous with Fall. If you appreciate easy and free decorating, you’re in the right […]

Is it safe to buy makeup on Poshmark? Testing makeup.

Is it safe to buy makeup on Poshmark?

You probably know that you can buy clothing and accessories on Poshmark, but did you know you could buy makeup, too? I was skeptical when I first came across this. Is it safe to buy makeup on Poshmark? I had to know. So, I placed several orders, with several different sellers, and I’ve had a […]

Dark Autumn Art Print Collection

Autumn decorating season is upon us. Have you started? I don’t have much up yet but I have been collecting things to put up. Usually for seasonal decorating, I go for creating a vibe. I feel like Fall can go two different ways. The first, warm and vibrant. The second, moody and dark. Today I’m […]

Autumn Bucket List (Things to do in Fall)

I can feel it coming in the air tonight… Autumn is nearly here! What a joy. I start to feel the excitement when the faint hint of crispness hits the air. Fall is my favorite season. There are so many great things to do in Fall. Somehow I always miss doing activities so this year […]

Keep Reading...

@Instagram

Subscribe